Showing posts with label Mc Projects. Show all posts
Showing posts with label Mc Projects. Show all posts
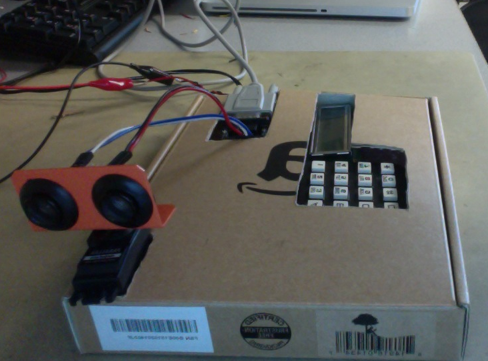
Ultrasonic Security System
We were inspired to build an ultrasonic security system for our final project by our housing situation this summer. Security is an important part of home,
 Introduction


PIC Countdown Timer (0-99)

This project describes how to program PIC16F628A to function as a 00-99 min programmable timer. User can set any time between 00-99 minutes and can turn ON a device for that period. The device will be automatically turned OFF after the time expires.
GSM Home Security Alarm System with Arduino

This project deals with the design & development of a theft control system for home, which is being used to prevent/control any theft attempt. The developed system makes use of an embedded system (comprises an open hardware microcontroller and a gsm modem) based on Global System for Mobile communication (GSM) technology.
Arduino & Raspberry Pi Camera Interface

Alphanumeric LCD with Shift Register on Arduino

ATmega8 Line Follower Robot (LFR) Project
Now that the mechanical assembly part is over,and we have completed the construction of left and right (L&R) infrared sensor cards. Since the MCU (ATmega8) cannot drive the dc motors directly, a dedicated motor driver circuit is used. The motor driver circuit here is based on a simple 16-pin IC (L293D) which can drive two dc motors independently.
Arduino RFID Reader RC522 + Access Control System
I just received my RC522 RFID reader and made this simple Arduino access control system that uses the reader, a buzzer for the alarm and a relay shield for the security system. The relay can be used to open a door lock and if you need a louder alarm then you can replace the small buzzer with a high power siren.
8051 code of Low Cost path Lightening and Presence Detector
8051-P89V51RD2 */
#include <reg51.h>
#include <string.h>
#include <reg51.h>
#include <string.h>
Check for balanced parentheses in an Expression
Algorithm:
1) Now traverse the expression string exp.
a) If the current character is a starting bracket (‘(‘ or ‘{‘ or ‘[') then push it to stack.
b) If the current character is a closing bracket (')' or '}' or ']‘) then pop from stack and if the popped character is the matching starting bracket then fine else parenthesis are not balanced.
2) After complete traversal, if there is some starting bracket left in stack then “not balanced”
Implementation :
1) Now traverse the expression string exp.
a) If the current character is a starting bracket (‘(‘ or ‘{‘ or ‘[') then push it to stack.
b) If the current character is a closing bracket (')' or '}' or ']‘) then pop from stack and if the popped character is the matching starting bracket then fine else parenthesis are not balanced.
2) After complete traversal, if there is some starting bracket left in stack then “not balanced”
Implementation :
Vb.net code to read from ComPort and display!!
Public Class Form1
Dim c1 As Char
Private Sub SerialPort1_DataReceived(ByVal sender As Object, ByVal e As System.IO.Ports.SerialDataReceivedEventArgs) Handles SerialPort1.DataReceived
Dim c1 As Char
Private Sub SerialPort1_DataReceived(ByVal sender As Object, ByVal e As System.IO.Ports.SerialDataReceivedEventArgs) Handles SerialPort1.DataReceived
Print Level Order binary tree Linked List implementation (BST)
#include<stdio.h>
#include<conio.h>
#include<stdlib.h>
#include<conio.h>
#include<stdlib.h>
C# Code as drivers for interfacing LCD display with 8051
using System;
using System.Collections.Generic;
using System.ComponentModel;
using System.Data;
using System.Collections.Generic;
using System.ComponentModel;
using System.Data;
8051 Keil code to Rotate a String on LCD screen
/** Code Source :- www.tentuts.com **/
#include<reg51.h>
sbit rw=P2^0; //read write pin
sbit rs=P2^1; // data/command pin
sbit en=P2^2; //enable pin
#include<reg51.h>
sbit rw=P2^0; //read write pin
sbit rs=P2^1; // data/command pin
sbit en=P2^2; //enable pin
Keil Code for Reading 4x4 Matrix Keypad and sending to System buffer
#include <reg51.h>
#include <string.h>
char READ_SWITCHES(void);
char get_key(void);
#include <string.h>
char READ_SWITCHES(void);
char get_key(void);
8051 Program to take input from COM port and Display on LCD
//Embeded C program ( keil Program)
// 8051 Microcontroller
/*This Program is made to display Characters on LCD screen typed From PC Keyboard --interfaced with 8051 */
// 8051 Microcontroller
/*This Program is made to display Characters on LCD screen typed From PC Keyboard --interfaced with 8051 */
Keyboard-MCU interfacing take a input from keypad and display on LCD
This experiment is easy to be realised in laboratory with exact hardware as shown in the Animation. However if students are interested in software simulations, they can use AVR studio to generate the HEX code and then simulate their program in Proteus.
AVR Studio
AVR studio is required to write the C-code and generate its HEX code. To download the AVR Studio 5 kindly follow the download link provided inSoftware tab. The C-code for AVR studio is provided.
PROTEUS ISIS:
The "Proteus ISIS" is required to design and simulate the circuit. The circuit diagram for Proteus is provided.
To download the TRIAL VERSION OF PROTEUS LITE kindly follow the download link provided in Software tab.
ATmega8 Line Follower Robot (LFR) Project
Robotics is the branch of technology that deals with the design,
construction, operation, and application of robots, as well as computer
systems for their control, sensory feedback, and information
processing. The word robotics comes from Runaround, a short story
published in 1942 by Isaac Asimov. Robot is an electro-mechanical
machine that is guided by a computer program or electronic circuitry.
Interfacing 8051 with LCD (4 bit Mode)
Interfacing LCD in 4 bit mode with 8051 microcontroller.
This is an example how to interface to the standard Hitachi-44780 LCD using an AT89S51 microcontroller and Keil as C Compiler. I use a standard 16-character by 2-line LCD module, see schematic below. Here, I use 4-bit interfacing.
Subscribe to:
Posts (Atom)